
This lab is recommended for students who have completed the labs in the Secure Workloads in Google Kubernetes Engine quest. Are you ready for the challenge?
Topics tested:
- Enable TLS access using nginx-ingress and cert-manager.io
- Secure traffic with a network policy
- Enable Binary Authorization to ensure only approved images are deployed
- Ensure that pods do not allow escalations to root
Task 0: Download the necessary files
Open Cloud Shell and run the following to collect all the files made available to you:
gsutil cp gs://spls/gsp335/gsp335.zip .
unzip gsp335.zipTask 1: Setup Cluster
To create a cluster for your demo, use the following values to ensure you have enough resources:
- zone: us-central1-c
- machine-type: standard-4
- nodes: 2
- Enable network policy
gcloud container clusters create kraken-cluster \
   --zone us-central1-c \
   --machine-type n1-standard-4 \
   --num-nodes 2 \
--enable-network-policyTask 2: Setup WordPress
If you have not setup WordPress using Cloud SQL before, here are some general steps for you here:
Setup the Cloud SQL database and database username and password
Create a Cloud SQL instance in
us-central1, using the default values.
gcloud sql instances create kraken-cloud-sql --region us-central1Create a Cloud SQL database for WordPress.
wordpress as the database name.Create a user using the following values:
- In the Cloud SQL page, select the Users tab on the left panel.
- Click *ADD USER ACCOUNT.
- Enter
wordpressas the User name. - Enter a password that you can remember.
- Select Allow any host (%) for the name of Host.
- Click Add.
Create a service account for access to your WordPress database from your WordPress instances
Create the service account.
gcloud iam service-accounts create kraken-wordpress-sa
gcloud projects add-iam-policy-binding $DEVSHELL_PROJECT_ID \
   --member="serviceAccount:kraken-wordpress-sa@$DEVSHELL_PROJECT_ID.iam.gserviceaccount.com" \
   --role="roles/cloudsql.client"
gcloud iam service-accounts keys create key.json \
--iam-account=kraken-wordpress-sa@$DEVSHELL_PROJECT_ID.iam.gserviceaccount.com
Use this as a template:Bind the service account to your project, give the role roles/cloudsql.client.
Save the service account credentials in a
jsonfile.Save the service account json file as a secret in your Kubernetes cluster.
kubectl create secret generic cloudsql-instance-credentials --from-file key.json
- Save the WordPress database username and password you used in step #4 as secrets in your Kubernetes cluster.
Use this as a template:
kubectl create secret generic cloudsql-db-credentials \
    --from-literal username=wordpress \
    --from-literal password=''
Create the WordPress deployment and service
Use
kubectl create -f volume.yamlto create a persistent volume for your WordPress application.Open
wordpress.yamland replace INSTANCE_CONNECTION_NAME with the instance name of your Cloud SQL database (the format is project:region:databasename).Use
kubectl apply -f wordpress.yamlto create the WordPress environment.

goto editor and reolace isntance name with sql instance name
save

kubectl apply -f wordpress.yamlTask 3: Setup Ingress with TLS
Set up nginx-ingress environment
Make sure you add and update the stable repo for helm.
Install stable nginx-ingress (call it nginx-ingress).
helm version

helm repo add stable https://charts.helm.sh/stable
helm repo update

helm install nginx-ingress stable/nginx-ingress --set rbac.create=true
Set up your DNS record
Check the service
nginx-ingress-controlleras an external IP address before continuing (kubectl get svc) to the next step.
kubectl get serviceRun the command
. add_ip.sh. You should seerecord added. You now have a DNS record added of the format YOUR_LAB_USERNAME.labdns.xyz which points to your ingress cluster (the script will output your DNS name).
. add_ip.sh
*COPY THE USER NAME
Set up cert-manager.io
Install cert-manager.io (make sure you use the right version - v0.16.0 works well with this lab).
kubectl apply -f https://github.com/jetstack/cert-manager/releases/download/v1.2.0/cert-manager.yamlkubectl create clusterrolebinding cluster-admin-binding \
--clusterrole=cluster-admin \
--user=$(gcloud config get-value core/account)Edit
issuer.yamland set the email address to the email address of your wordpress service account.goto editor and edit issuer.yaml to include lab email address
kubectl apply -f issuer.yamlUse
kubectl apply -f issuer.yamlto setup the lets encrypt prod issuer.
Configure nginx-ingress to use an encrypted certificate for your site
Edit
ingress.yamland set the dns and domain name to your YOUR_LAB_USERNAME.labdns.xyz. Don't forget to remove any_characters from your username when using it as the dns.Use
kubectl apply -f ingress.yaml.
goto editor and edit ingress.yaml to include dns address received as output from . add_ip.sh

kubectl apply -f ingress.yamlTask 4: Set up Network Policy
- Show your colleagues how to restrict the network traffic using the provided
network-policy.yamlfile. It's not complete; you will need to add the configuration to allow ingress traffic from the world into nginx-ingress, but you can solve that easily.
goto editor and in network-policy.yaml add to end---
apiVersion: networking.k8s.io/v1
kind: NetworkPolicy
metadata:
name: allow-world-to-nginx-ingress
namespace: default
spec:
podSelector:
matchLabels:
app: nginx-ingress
policyTypes:
- Ingress
ingress:
- {}
kubectl apply -f network-policy.yamlTask 5: Setup Binary Authorization
- Show your colleagues how to configure Binary Authorization to only allow the following images in your cluster:
docker.io/library/wordpress:latestus.gcr.io/k8s-artifacts-prod/ingress-nginx/*gcr.io/cloudsql-docker/*quay.io/jetstack/*
Configure Binary Authorization Policy
- In the Cloud Console, navigate to Security > Binary Authorization.
- Enable the Binary Authorization API.
- On the Binary Authorization page, click on CONFIGURE POLICY.
- Select Disallow all images for the Default rule.
- Scroll down to Images exempt from this policy, click ADD IMAGE PATH.
- Paste
docker.io/library/wordpress:latestto the textbox, and click DONE. - Repeat the above two steps to add the following image paths:
docker.io/library/wordpress:latestus.gcr.io/k8s-artifacts-prod/ingress-nginx/*gcr.io/cloudsql-docker/*quay.io/jetstack/*
- Click SAVE POLICY.

Enable Binary Authorization in Google Kubernetes Engine
- Navigate to Kubernetes Engine > Clusters.
- Click your cluster name to view its detail page.
- Click on the pencil icon for Binary authorization under the Security section.

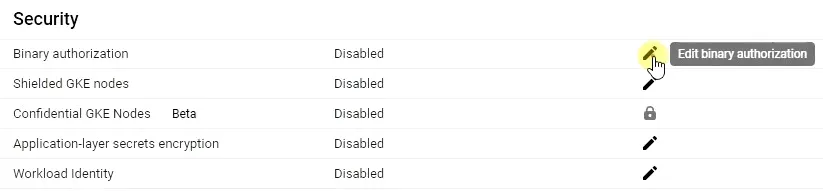
- Check Enable Binary Authorization in the dialog.
- Click SAVE CHANGES.
Task 6: Setup Pod Security Policy
- Some Pod Security Policy demo files have been provided for you to use in your demo. They will forbid the use of the root user and prevent the mounting of the host filesystem within a container.
Remember to check the restrictions using a service account that has the role roles/container.developer as this will simulate a typical developer.
edit psp-restrictive.yaml
line 2 change extensions/v1beta1 to policy/v1beta1
kubectl apply -f psp-restrictive.yaml
kubectl apply -f psp-role.yaml
kubectl apply -f psp-use.yaml
Comments
Post a Comment